We spent most of the morning talking about pictures. When you plug in your cell phone or your camera’s SD card, or your digital camera itself to your Windows PC, you can select to have it automatically upload the pictures it finds. By default, they should end up in the Pictures folders in a sub-folder called Camera Roll.
If you are using the drag and drop method to get you pictures off your camera, you will find them located in folder named DCIM. They will have a sequentially numbered name and an extension (the characters after the rightmost dot) of JPG or JPEG. If the file is a movie it could be a MOV extension or a MP4. Other picture extensions are BMP. PNG, and GIF. Cameras do not use these last three.
So there they are all in one folder with all the other pictures you have taken and uploaded before. And they all have strange names that see to have no meaning at all. Best to create a folder under Pictures or even under Camera Roll naming it something that relates to what was just uploaded, like Christmas 2016. Then select the picture that pertain to that event and copy them into the new folder (Christmas 2016).
When copying files or groups of files, left drag will move them if the files are going from and to the same device. If they are going to a different device like in the case of your SD card to your hard drive, a left drag will copy them, leaving the original in place. If you right-drag instead of left, when you release the mouse button a selection box will appear that allows you to choose Copy or Move.
Now they are all together and much easier to find later. But they still have the odd names. You could look at each picture and rename them to fit the scene. Or you could select all of them using the shift-click method (click the top one, then scroll down and hold the shift key down as you click on the last one) or use Ctrl+A to select all the pictures. Then Right-click on the first one and choose Rename. Create a meaningful name (like Christmas Pictures), When you press Enter, all the selected pictures are renamed the same with a suffix of (1), (2), (3), etc.
As a side note, Ctrl+Z will undo the last action and Ctrl+Y will redo it. You can also right-click on the desktop and undo it.
OK, the pictures are organized and renamed. Now what? Well you might want to show them to others. In the past I would have said to plug in a blank CD or DVD and burn them onto it. Then mail it away to whomever. That was before the “cloud”. Upload your picture to Google Photos, Dropbox, OneDrive, etc. Then share the pictures or folder of pictures with others. You will get a link address you can email or message others so they can see and download your pictures, but only the ones you have shared. They will NOT have access to your cloud drive; only the folders or files you chose to share with them.
We also looked the Photos App in Windows 10 and saw how to edit our pictures. And then how to open the pictures in the Paint program to add descriptions right on the image itself. I do suggest saving the result as a new file so you keep the original intact.
Then we looked at a free program from Microsoft called Photo Story 3. It is a simple, self explanatory program to build a slideshow of your pictures. You can even add narration, captions, and music.
http://tinyurl.com/z35xnvl
Oh, one last item--printing. With the low cost of letting someone else (Walgreens, CVS, WalMart, Sam’s Club, etc) it is less expensive and much higher quality to send the ones you want printed to them using their online app or going right to the store with the images on a flash drive or SD card. The glossy pictures are so much better than what we can print at home and usually you can pick them up in an hour or less. You can even print the for you family far away and let them pick them up at their local WalMart or other store.
Thern we looked at using the Hallmark Greeting Card program (about $30 to purchase) to print greeting cards. Each card can be personalized in word and with pictures. Save some money on cards and the time to go find them by generating your own right at home.
http://tinyurl.com/gwshmkx
Was asked about downloading videos from YouTube. There are programs you can download to do it, but you can also do it online. Open the YouTube video you want to grab.
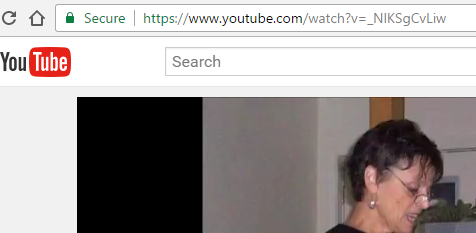
Place your mouse in the address bar after the www. And type dl

Then press the Enter key. (Will not open if and adblocker is present)
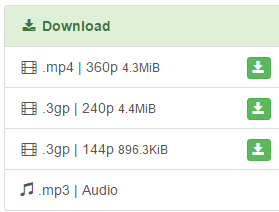
Now you choose what you want to capture. I suggest the mp4 format as most video programs accept that format. The file will end up in your Download folder.
Next week we will look at various programs to use for word processing and talk about inserting pictures.
No comments:
Post a Comment